The VW T6․1 represents a significant evolution, offering modern features and enhanced safety․ Discussions revolve around upgrades like LED rear lights and smart thermostat installations․
Owners share experiences, including transitioning from older models like the T4, and exploring automatic transmission options․ The T6․1’s electrical system is complex․
SSP 705 documentation provides key technical insights, while forums offer community support and advice on modifications․ Service intervals and longlife regimes are crucial․
Overview of the T6․1 Model
The Volkswagen T6․1 builds upon the successful T6, introducing refined styling, updated technology, and improved driver assistance systems․ Available in Multivan, Caravelle, Transporter, and California variants, it caters to diverse needs․
Central to the T6․1’s functionality is the Body Control Module (BCM), governing numerous electrical systems․ Owners actively discuss modifications, including LED rear light integration and the installation of smart thermostats like the T6 Pro․
Understanding the T6․1’s electrical architecture, including CAN bus communication and coding adaptations, is vital for successful upgrades and troubleshooting․
Key Differences Between T6 and T6․1
The T6․1 represents a substantial upgrade over the T6, featuring a modernized exterior and interior design․ Significant electrical system enhancements necessitate careful consideration during modifications, such as a T6 Pro smart thermostat installation․
Notably, the BCM’s role is expanded, requiring advanced coding and adaptation knowledge․ Discussions highlight potential compatibility issues with older T6 components, like LED rear lights․
SSP 705 details these changes, emphasizing the T6․1’s increased reliance on digital systems and the importance of proper diagnostic tools for troubleshooting․

Pre-Installation Considerations
Careful planning is essential; verify vehicle compatibility and gather necessary tools․ Prioritize safety, understanding the T6․1’s complex electrical system before starting installation․
Vehicle Compatibility Check
Confirming compatibility is paramount before initiating the T6 Pro installation․ The T6․1 encompasses various models – Multivan, Caravelle, Transporter, and California – each potentially having unique electrical configurations․
Specifically, consider model year variations as updates occurred throughout the T6․1 production run․ Ensure the thermostat is designed for your vehicle’s engine type and transmission (manual or DSG)․ Referencing SSP 705 documentation can reveal critical electrical differences between variants․
Double-check for existing modifications that might interfere with the installation process, and verify the vehicle’s BCM (Body Control Module) version for coding requirements․
Tools Required for Installation
A successful installation demands specific tools․ You’ll need a VCDS (or compatible diagnostic tool) for coding and adaptation, essential for the T6․1’s BCM․ Standard tools include a socket set, screwdrivers (Torx and flathead), and pliers․
Additionally, a multimeter is crucial for verifying wiring connections and voltage levels․ Cable ties will help with neat wire management․ Consider a trim removal tool to avoid damaging interior panels during access․
Finally, a reliable power source and potentially resistors (depending on LED rear light integration) may be necessary․
Safety Precautions
Prioritize safety during installation․ Disconnect the vehicle’s battery negative terminal to prevent electrical shorts and damage to the BCM․ Exercise caution when working with the electrical system, as incorrect wiring can cause malfunctions․
Ensure the vehicle is parked on a level surface with the parking brake engaged․ Avoid working alone; having an assistant is recommended․ Wear appropriate safety glasses and gloves․
Always refer to the SSP 705 documentation for specific wiring diagrams and procedures to minimize risks․

Understanding the T6․1 Electrical System
The T6․1’s BCM controls central electrics, requiring coding and adaptations for new components․ Measurement blocks provide diagnostic data, crucial for troubleshooting installations․
BCM (Body Control Module) Basics
The Body Control Module (BCM) is central to the T6․1’s electrical architecture, managing numerous functions․ Understanding its role is vital when installing aftermarket components like the T6 Pro Smart Thermostat․ Decoding, adaptations, and measurement blocks are key to interacting with the BCM effectively․
VCDS (VAG-COM Diagnostic System) is frequently used to access and modify BCM settings․ Incorrect coding can lead to malfunctions, so careful attention to detail is essential․ The BCM controls communication between various vehicle systems․
Coding and Adaptations
Successful T6․1 modifications often require coding and adaptations within the vehicle’s control modules, particularly the BCM․ VCDS is the preferred tool for these procedures, allowing access to various settings․ Specific coding may be needed to enable the T6 Pro Smart Thermostat’s functionality․
Adaptation values might need adjustment to ensure proper temperature regulation and communication․ Incorrect coding can cause errors, highlighting the importance of accurate information and careful execution․
Measurement Blocks Explained
Measurement blocks within VCDS provide real-time data from the vehicle’s control modules, crucial for diagnosing issues and verifying the T6 Pro Smart Thermostat’s operation․ Monitoring coolant temperature, fan speed, and thermostat status is essential post-installation․
Understanding these values allows confirmation of correct coding and adaptation․ Analyzing measurement blocks helps identify communication problems or discrepancies, ensuring optimal performance and preventing potential errors․
Installation Process ‒ Step-by-Step
The process involves removing the original thermostat, carefully wiring the T6 Pro unit, and connecting it to the vehicle’s CAN bus for communication․
Removing the Original Thermostat
Begin by disconnecting the negative terminal of the battery to ensure electrical safety during the removal process․ Locate the original thermostat housing, typically near the engine coolant system․ Carefully disconnect any electrical connectors attached to the existing thermostat․
Loosen the hose clamps securing the coolant hoses to the thermostat housing, and gently detach the hoses, being prepared for some coolant spillage․ Remove the mounting bolts or screws holding the thermostat housing in place, and carefully remove the old thermostat assembly․
Inspect the gasket surface for any debris or corrosion, cleaning it thoroughly before proceeding with the installation of the T6 Pro Smart Thermostat․
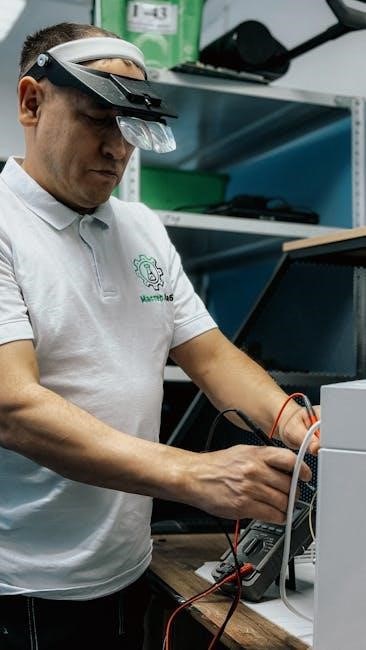
Wiring the T6 Pro Smart Thermostat
Identify the designated wiring harness for the T6 Pro, referencing the installation guide for correct pin assignments․ Connect the power, ground, and CAN bus wires, ensuring secure connections to prevent signal interference․ Utilize appropriate connectors and crimping tools for reliable electrical contact․
Carefully route the wiring harness away from moving parts and heat sources, securing it with cable ties to prevent damage․ Double-check all connections against the wiring diagram before proceeding, verifying polarity and continuity․
Ensure proper insulation of all exposed wires to avoid short circuits and maintain vehicle safety․
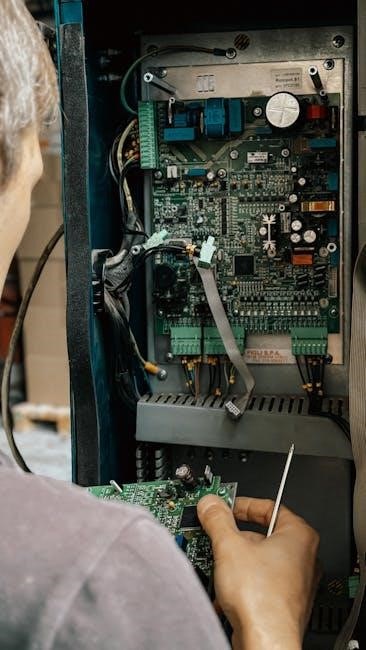
Connecting to the Vehicle’s CAN Bus
Locate the vehicle’s CAN bus connection point, typically found within the BCM (Body Control Module) wiring harness․ Utilize a suitable T-tap connector to intercept the CAN High and CAN Low wires without damaging the original wiring․
Connect the T6 Pro’s CAN bus wires to the corresponding T-tap connectors, ensuring correct polarity․ Verify the connection with a multimeter to confirm signal transmission․
Secure the CAN bus connection and protect it from environmental factors, as proper communication is vital for thermostat functionality․
Post-Installation Configuration
VCDS coding is essential to integrate the T6 Pro thermostat, enabling full functionality and communication with the vehicle’s systems; Testing verifies correct operation․
Interface setup allows customization of settings, while addressing potential compatibility conflicts ensures seamless integration․
VCDS Coding for T6․1
Successfully integrating the T6 Pro thermostat demands precise VCDS coding․ Accessing the Body Control Module (BCM) is crucial, utilizing measurement blocks to confirm communication․ Adaptations may be needed to enable the thermostat’s features, ensuring proper temperature regulation․
Specific coding values will depend on the vehicle’s configuration, potentially requiring adjustments for different T6․1 models like the Multivan or California․ Referencing community forums and SSP 705 documentation can provide valuable insights into optimal coding parameters․
Incorrect coding can lead to malfunctions, so proceed cautiously and document all changes․
Setting Up the Smart Thermostat Interface
The T6 Pro thermostat interface offers remote control and customization․ Initial setup involves connecting to the vehicle’s CAN bus and verifying communication through VCDS․ Explore the thermostat’s settings to tailor temperature profiles and fan speeds to your preferences․
Integration with other vehicle systems, if available, can enhance functionality․ Regularly check for software updates and firmware to ensure optimal performance and access to new features․
A user-friendly interface simplifies operation, providing real-time temperature monitoring and control․
Testing and Verification
Post-installation, thorough testing is crucial․ Verify the thermostat controls heating and cooling effectively across various driving conditions․ Monitor temperature readings for accuracy and responsiveness, comparing them to the vehicle’s original system․
Check for error codes using VCDS to identify any communication issues or compatibility conflicts․ Confirm remote control functionality operates as expected, and all customized settings are retained․
Document all test results for future reference and troubleshooting․
Troubleshooting Common Issues
Common problems include error codes, communication failures, and compatibility conflicts․ VCDS diagnostics are essential for identifying and resolving these issues efficiently․
Error Codes and Their Meanings
Decoding error messages is vital when installing the T6 Pro․ Issues can stem from incorrect coding, wiring faults, or CAN bus communication problems․ VCDS is crucial for reading these codes, providing specific details about the malfunction․
Common codes relate to the BCM (Body Control Module) and temperature sensors․ Understanding these codes, often found in forum discussions, allows for targeted troubleshooting․ Referencing SSP 705 can offer deeper technical explanations of the T6․1’s electrical architecture and error reporting systems․
Resolving Communication Problems
CAN bus communication failures are frequent post-installation․ Verify all wiring connections, ensuring proper grounding and secure terminations․ Utilize VCDS to check for bus errors and address conflicts with other modules․
Incorrect coding of the BCM can also disrupt communication․ Consult forum discussions for known solutions and adaptation values․ SSP 705 documentation provides insights into the CAN bus structure, aiding in diagnosis and resolution of these complex issues․
Addressing Compatibility Conflicts
Potential conflicts arise when integrating the T6 Pro with existing vehicle systems․ LED rear light installations sometimes require resistors to avoid error messages․ Sliding door latch compatibility needs verification, as updates may impact functionality․
Ensure VCDS coding aligns with your specific T6․1 model (Multivan, Caravelle, or Transporter)․ Forum discussions highlight known conflicts and workarounds, offering valuable community-sourced solutions for seamless integration․
Advanced Features and Customization
The T6 Pro enables remote control and integration with other vehicle systems․ Customization of thermostat settings allows personalized comfort, enhancing the driving experience significantly․
Remote Control Functionality
The T6 Pro Smart Thermostat’s remote control capabilities offer unparalleled convenience, allowing users to adjust cabin temperature from anywhere with a network connection․ This feature is particularly useful for pre-heating or pre-cooling the vehicle before a journey, ensuring optimal comfort upon entry․
Integration with smartphone apps provides a user-friendly interface for managing thermostat settings․ Notifications can alert drivers to temperature changes or system status, enhancing control and peace of mind․ This functionality elevates the T6․1’s overall user experience․
Integration with Other Vehicle Systems
Seamless integration with the T6․1’s existing electrical architecture is a key benefit of the T6 Pro Smart Thermostat․ Utilizing the CAN bus, the thermostat can communicate with the vehicle’s central control module (BCM), enabling advanced features and data exchange․
This connectivity allows for potential synchronization with other systems, such as the climate control and infotainment system․ VCDS coding is often required to unlock the full potential of this integration, ensuring optimal performance and compatibility․
Customizing Thermostat Settings
The T6 Pro Smart Thermostat offers extensive customization options, allowing users to tailor the heating and cooling system to their specific needs․ Through the thermostat interface, users can adjust temperature setpoints, create custom heating schedules, and configure various operating modes․
Advanced settings may include fan speed control and integration with remote control functionality․ VCDS coding can further refine these settings, unlocking additional features and optimizing performance for different T6․1 models․

Maintenance and Updates
Regular checks ensure optimal performance, alongside software updates and firmware for the T6 Pro․ Longlife service intervals remain relevant, maintaining system reliability and longevity․
Regular Checks and Maintenance
Consistent monitoring of the T6 Pro’s operation is vital․ Periodically verify wiring connections, ensuring they remain secure and free from corrosion, especially after initial installation․ Inspect the thermostat’s interface for any signs of damage or malfunction․
Review vehicle logs, if accessible through the smart thermostat’s interface, to identify any unusual temperature fluctuations or error patterns․ Adhering to Volkswagen’s flexible or longlife service regimes will also contribute to the overall health of the vehicle’s electrical system․
Software Updates and Firmware
Staying current with the T6 Pro’s software is crucial for optimal performance and compatibility․ Check the manufacturer’s website regularly for firmware updates, addressing potential bugs or adding new features․ Ensure updates are downloaded from a trusted source to avoid security risks․
Follow the provided instructions carefully during the update process, as interruptions can cause malfunctions․ Consider the vehicle’s electrical system; a stable power supply is essential during firmware installations․
Longlife Service Intervals Relevance
Adhering to Volkswagen’s Longlife Service regime is vital, even with aftermarket installations like the T6 Pro thermostat․ Regular oil changes and inspections ensure the vehicle’s longevity and maintain warranty compliance․ The thermostat’s performance can be affected by degraded engine oil․
Monitor service indicators and schedule maintenance accordingly․ Properly documented service history is essential for resale value and demonstrates responsible vehicle ownership․

Community Resources and Support
VW T6 forums are invaluable for sharing experiences and seeking advice on installations․ Online guides and professional services offer assistance with the T6 Pro․
VW T6 Forum Discussions
Active VW T6 forums serve as central hubs for owners discussing the T6․1 and modifications․ Users frequently share experiences with aftermarket installations, including smart thermostats․
Discussions cover coding requirements, potential compatibility issues, and troubleshooting steps․ Members often post detailed guides and ask for help with VCDS adaptations․
The community provides valuable insights into LED rear light integration and sliding door latch compatibility, relevant to overall vehicle upgrades and electrical systems․
Online Guides and Tutorials
Numerous online resources detail VW T6․1 modifications, though dedicated T6 Pro thermostat guides are emerging․ Existing tutorials focus on VCDS coding and accessing measurement blocks within the BCM․
These guides often complement SSP 705 documentation, offering practical application of technical insights․ Users share step-by-step instructions and visual aids for wiring and installation․
Finding resources specific to the T6․1 is key, as differences from the T6 necessitate tailored approaches to electrical system adaptations and component integration․
Professional Installation Services
Given the T6․1’s complex electrical system, professional installation is recommended for those unfamiliar with VCDS coding and BCM adaptations․ Specialists possess the necessary diagnostic tools and expertise․
Experienced technicians can ensure correct wiring to the CAN bus and accurate thermostat configuration, minimizing potential compatibility conflicts․ They understand SSP 705 insights․
While DIY guides exist, professional services offer peace of mind and guarantee proper functionality, especially concerning LED light integration and automatic transmission considerations;

Specific T6․1 Component Considerations
LED rear light integration and sliding door latch compatibility require attention during installation․ Automatic transmission models may present unique coding challenges for optimal performance․
LED Rear Light Integration
Upgrading to LED rear lights on the T6․1 often appears as a plug-and-play modification, however, some users report the potential need for resistors to resolve compatibility issues․ Discussions highlight that replacing existing T6 LED units with T6․1 versions may necessitate coding adjustments․
Proper coding ensures full functionality, preventing error messages or unexpected behavior․ Careful consideration of the vehicle’s electrical system is vital for a seamless integration, avoiding potential conflicts with other components․
Sliding Door Latch Compatibility
The sliding door latch is a noted area for potential improvement on the T6․1, with some owners discovering issues after purchase․ Discussions suggest awareness of this component is crucial, particularly when upgrading or modifying the vehicle’s existing systems․
Compatibility should be verified before installation to avoid operational problems․ While seemingly unrelated to thermostat installations, ensuring all vehicle functions operate correctly contributes to overall system stability and avoids unforeseen electrical conflicts․
Automatic Transmission Considerations
Owners transitioning to T6․1 automatics often share experiences, particularly those moving from manual transmissions due to health concerns․ While a smart thermostat installation is generally independent of the transmission, it’s vital to avoid any electrical interference․
Ensure the installation process doesn’t impact the transmission control unit (TCU) or its associated wiring․ Thorough testing post-installation is recommended to confirm no adverse effects on gear changes or overall transmission performance․

T6․1 Model Variations
Installation procedures are generally consistent across Multivan, Caravelle, Transporter, and California models․ However, specific interior layouts may require minor adjustments during wiring․
Multivan Specifics
Multivan models often feature more extensive factory wiring due to integrated climate control and auxiliary heating systems․ This increased complexity may necessitate careful identification of existing wiring harnesses during the T6 Pro installation․
Accessing the CAN bus can be slightly more challenging due to additional comfort modules․ Thoroughly consult SSP 705 documentation for Multivan-specific wiring diagrams․ Ensure compatibility with existing climate control features, and perform comprehensive VCDS coding;
Consider potential interference with the rear climate control unit, and verify proper operation post-installation․
Caravelle Specifics
Caravelle trims typically have a simpler electrical setup compared to the Multivan, potentially streamlining the T6 Pro installation process․ However, variations exist based on optional extras like auxiliary heating․
Verify the presence of a factory-fitted thermostat and its wiring configuration before commencing․ Accessing the BCM may require removing interior trim panels․ Careful coding with VCDS is essential to ensure seamless integration․
Double-check compatibility with any existing rear heating controls and thoroughly test functionality post-installation․
Transporter and California Models
Transporter and California models often present unique challenges due to diverse factory configurations and aftermarket additions, impacting thermostat installation․ California models, in particular, may have complex auxiliary heating systems․
Carefully assess wiring harnesses and identify any existing control modules that might interfere with the T6 Pro․ Thoroughly document the original setup before disconnecting anything․
VCDS coding is crucial for proper functionality, especially regarding temperature sensors and fan control․ Verify compatibility with existing campervan features․
Understanding SSP 705 Documentation
SSP 705 details the T6․1’s systems, aiding understanding of the electrical architecture․ It’s a valuable resource for complex installations like the T6 Pro thermostat․
Navigating the Self Study Program
The VW SSP 705 is structured to progressively reveal technical details of the T6․1․ Begin with the overview sections to grasp the vehicle’s core systems before diving into specifics․
Focus on chapters covering the body control module (BCM) and CAN bus communication, as these are central to the T6 Pro thermostat’s integration․ Diagrams and schematics are invaluable for tracing wiring and understanding data flow․
Utilize the index to quickly locate information related to specific components or coding procedures․ Remember, SSP 705 provides foundational knowledge, not step-by-step installation guides․
Key Technical Insights from SSP 705
SSP 705 highlights the T6․1’s advanced electrical architecture, emphasizing the BCM’s role in managing vehicle functions․ Understanding measurement blocks is crucial for diagnosing issues post-installation․
The document details CAN bus communication protocols, essential for the thermostat’s data exchange with the vehicle․ It clarifies coding and adaptation procedures, vital for enabling the thermostat’s features․
Pay attention to sections on thermal management systems, providing context for the thermostat’s function․ SSP 705 offers a deep dive into the T6․1’s electronic complexities․

Future Upgrades and Modifications
Explore potential add-ons, enhancing the T6 Pro’s functionality․ Further vehicle customization, like integrating with other systems, unlocks new possibilities for a connected experience․
Potential Add-ons for the T6 Pro
Beyond the core thermostat functionality, consider integrating remote control capabilities for pre-heating or cooling․ Exploring compatibility with existing vehicle systems, such as the central locking or infotainment, could streamline operation․
Further enhancements might include advanced scheduling features, geofencing for automatic climate control, or even voice command integration․ Investigating aftermarket sensors for cabin temperature or humidity could refine the system’s precision․
Remember to prioritize compatibility and proper coding to avoid conflicts with the T6․1’s complex electrical architecture, referencing SSP 705 for guidance․
Exploring Further Vehicle Customization
Having successfully installed the T6 Pro, consider broader vehicle enhancements․ LED rear light upgrades, requiring potential coding, are popular․ Addressing sliding door latch compatibility issues is also common․
For automatic transmissions, research potential modifications and ensure compatibility․ Delve into VCDS coding to unlock hidden features and optimize performance․
The VW T6 forum provides a wealth of information on modifications, while SSP 705 offers technical insights․ Remember flexible service regimes and longlife intervals․